BLOG 5 PROJECT DEVELOPMENT !!
- dhasna22
- Feb 25, 2024
- 5 min read
Hello people, it's my last blog :( so join me a I share with all of you on how my team- Brewstars hurdled our mini project of making a tea-maker!
1.Our chemical device
Firstly let me address what you are probably thinking. Why tea-maker ?
Our end goal in mind was to ensure that we could make the lives of elderlies a little better with our innovation- elderlies are known to have a common condition of musculoskeletal such as tendonitis.Following that, what do elderlies enjoy sipping on? TEA! so our product will ensure that it is easy and quick to brew tea without the need for the old consumers to carry heavy objects and machines. It is also built in a way so that mantainence is a breeze and doesn't require the need to remove and assemble parts in a complex way.
Here is our hand sketch of our product !!

2. Team planning, allocation, and execution
This my team !!

CEO - The captain of our ship
CFO - The finance bro
COO - The overseer
CSO - The safety ambassador
Moving on lets take a look at our final Bill Of Materials we used,

Of course, below you will see our Gantt Chart,

Here is more easier timeline to see hahah,

3. Design and Build Process
Part 1 : Impeller and it's gear were done my Mabelle and here is her blog!https://mabelle22.wixsite.com/mabelleblogs/post/project-development
Part 2 : Main gears were done by me !!
Firstly, in Fusion360 I went to utilities > Add-Ins > Scripts and Add-Ins

Next, I click the SpurGear and then click "run"

Then I added in the dimensions for big gear,

After clicking "OK" , the big gear is done !

For the small gear , I repeated the same steps as above except I had to change the dimensions and my small gear is done!


With two designs done, lastly I made the gear's base compartment ,
Firstly, I created new sketch and re-did both the gears

Then I move the small gear by changing values in the X-axis
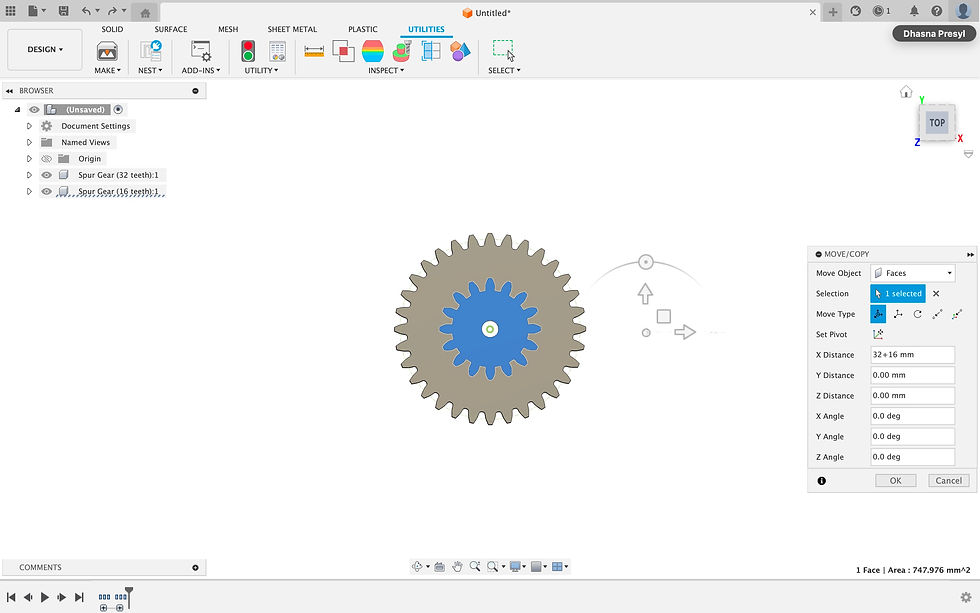

Next I created new component, and clicked on the big gear as parent body,

Then, I created and sketch and used the circle function to create circle outline on the smalll and big gear

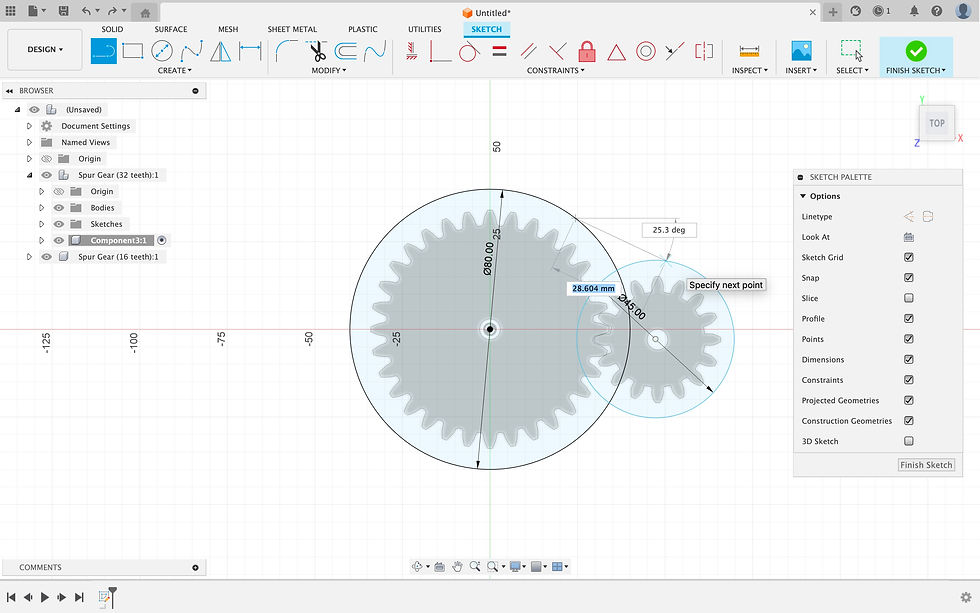
Then, using the line function I joined a line from the big circle and small circle

Next, I selected the tangent function then clicked the lines and the small circle


Next, I selected the sketch and extruded it

Then , I clicked on both the circles of my sketch and offset them by -0.2mm

Next, I extruded both the holes by 10mm

Next, I offset the same circle on both gears as earlier by 20mm for big gear and 10mm by small gear

Then, I extruded both the circles by -3mm

Lastly, here is my final base component !

I saved my designs into 3 different STL files; Big gear, Small gear and base component
then I proceeded to 3D printed them !!! Take a look below for the pictures and videos
Part 3 : Designing of the outer box was done by Jing Yue, check it out at his blog!https://jingyue22.wixsite.com/jing-yue-life-in-cpd/post/blog-5-prototyping
Part 4 : Arduino Programming was done by Yu Jie, Jing Yue and Mabelle! https://linyujie2005.wixsite.com/my-site/post/blog-6
Part 5 : Integration of all parts and electronics was done by us all!
We all assembled the various parts of the tea-maker together , I did the fixing of the tap into the container, and gluing the outer box onto the container and lastly drilling holes into the lid of the container so that the impeller, temperature sensor to fit in! We then placed the impeller and arduino into the outer box too:)
A LOT of hand tooling was used ..A LOT such as hot glue gun, soldering and the use of penknive

The embedded designs can be viewed by clicking the links below,
Big Gear: https://a360.co/49KunBV
Small Gear: https://a360.co/4bPFr2f
Base Component: https://a360.co/3USzFH5
We also did some slight modifications to our tea-maker

Here is a video of our tea-maker in action !
4. Problems and solutions
In this section ,the table below shows us the hiccups we faced and overcame!
Problems | Solutions |
Main gears could not be alligned with impeller gear due to base compartmnet added to main gears. Additionally, motor could not reach the gears preventing rotation. | We folded paper so that it's thick enough to provide added height at the bottom of the impeller gear so that it will reach the main gears .For the motor , since it could perfectly fit into the holeof the driver gear we decided to modify the positioning of the gears and used a carboard stand to rest the motor on.  |
Impeller gear teeth was not meshing with main gears as the pressure angle was very difficult to perfect. | With secondary research we figured out that we could you the equation 360/z/2 to determine the pressure angle and the impellar teeth finally meshed with the main gear teeths. *z= number of teeth  |
Outer box was designed with jaggered edges to be fitted nicely but dimensions were wrong so we could not close the lid properly | Since there were 4 pieces to be glues together, we modified the assembling by gluing 2 side pieces more further in instead of all 4 being glued toegteher by the side edges. This allowed for the lid to fit when the outer box is being closed. |
Water Leakage from the hole cut into the container to fit in the the plastic tap. | We hot-glued the sides of the tap so that when the hot glue solidifies its acts as a barrier so that the water will not leak out and be contained.  |
Arduino codes were not working | We then realised that the fault was in the set-up and not the codes. This was because one of the ground wire ports was not working on the breadboard.So, we had to change our set-up and use the working ground wire port instead. We also used Female-to-female wires and soldered them to connect all necessary wires to one ground port. |
Our initiala servo could not spin 360 degrees. | We opted for a more heavy-duty servo that could spin 360 degrees. |
5. Project design files
In this section, our design files can be seen through the google drive link:)
6. My learning reflection
It has finally come to an end , and I have acquired so many skills, learnings and experience. It is amazing that Brewstars - my team , we managed to bring life to our ideas and it was no easy ordeal for sure!
My biggest takeaway honestly was the physical prospect, we have to constantly brainstorm to elevate and modify our ideas so that we could enhance the functionality of our prototype. It was extremely crucial to always keep a flexible mindset throughout the whole of the project instead of a rigid mindset. This is because we never know when things may slip up so we had to be adaptable to unexpected challenges.
I can also say that I have definitely sharpened my CAD skills, it was a lot of learning and improving on my sketches and I had to play around with the many different tools available on Fusion360! I also learnt new skills such as soldering and hand-tooling safely of course
Effective time and resource management was a regular concern.Deadlines had to be met. So it was quite frustrating when we were not able to book 3D printing machines and Laser cutting machines. However, it was all about fast hands and proper timing and we managed to secure our machines haha. The Gantt chart was a great way for us to monitor our progress and keep ourselves on track.
Thorough documentation became apparent as a beneficial resource. Whenever we forgot codes or how we assembled our prototype it was easy for us to look back and remember and recollect our thoughts.
Lastly, how could this ever be possible without proper team dynamics.So thank you to my teammates, Jing Yue, Yu Jie and Mabelle for the amazing communication and communication. It was so important to always communicate our ideas, progress and difficulties with one another and my team managed to do just that. Not to forget but to also give and take constructive feedback with ease.
This experience has provided me with the sufficient skills, knowledge and experience I believe that would allow me to sail through FYP in the future.This mini project was already tiring and stressful so I can only imagine FYP. However, I am still excited to embark on a new project in Y3S2! To the once really disliked module - CPDD for me haha, I have grown to enjoy the intricate underlying understanding of this module . I appreciate all that I have learnt and picked up through this fruitful journey in CPDD.
Till I see ya'll again, thank you for journeying with me !


Comments